
The forex market moves because of imbalance. Price rises when demand exceeds supply and falls when supply becomes stronger than demand. Understanding this simple principle gives traders a significant edge in market analysis. This is why forex supply and demand trading has become one of the most effective approaches used by professional traders and institutional investors.
Unlike traditional indicators that react after price moves, supply and demand analysis focuses on the actual zones where strong buying or selling activity entered the market. These areas often become high-probability trading opportunities because institutions and large market participants leave footprints in price action.
Modern traders use supply demand forex zones to identify reversals, trend continuation setups, and low-risk entry points. Instead of randomly entering trades, they wait for price to return to important institutional zones where market reactions are more likely to occur.
The popularity of supply and demand trading continues to grow because it simplifies chart analysis while improving trade precision. When combined with proper risk management and price action confirmation, it can become a highly profitable forex trading strategy.
Forex supply and demand refers to the relationship between buyers and sellers in the currency market. Demand zones are areas where buying pressure was strong enough to push price upward aggressively. Supply zones are areas where strong selling pressure forced price downward rapidly.
These zones are important because they represent institutional activity. Banks, hedge funds, and large traders cannot enter massive positions instantly. Their orders create strong market imbalances that leave visible patterns on price charts.
A demand zone forms when buyers dominate the market and create bullish momentum. A supply zone forms when sellers gain control and push price lower. Traders analyze these zones to predict where future buying or selling pressure may appear again.
The core principle behind supply demand forex zones is simple: markets often revisit areas where large institutions previously entered the market.
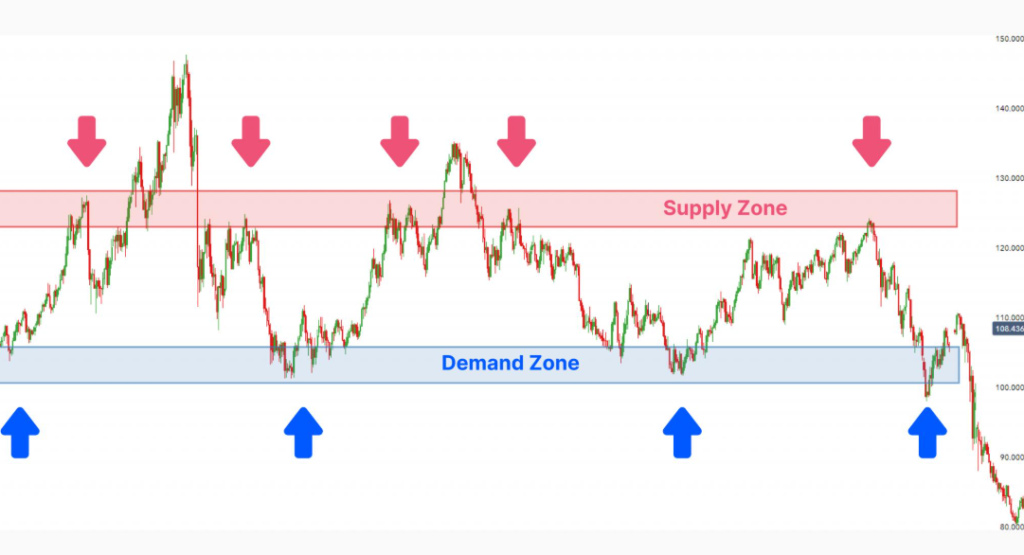
Fig 1.1 forex supply and demand trading chart showing institutional supply and demand zones
The reason forex supply and demand trading works so effectively is because markets are driven by institutional money. Large financial institutions move the market due to the size of their transactions.
Retail traders often focus on indicators, while professional traders focus on price imbalance and order flow. When institutions create strong bullish or bearish movements, unfilled orders often remain inside those zones. As price revisits those levels, the market may react again.
Supply and demand zones also reflect trader psychology. Many traders place pending orders around previous reversal areas. This creates liquidity and increases the probability of strong reactions when price returns.
Unlike lagging indicators, supply demand forex zones provide traders with forward-looking market structure. This allows traders to anticipate potential market reactions instead of reacting after moves already happen.
Identifying strong supply demand forex zones requires careful observation of price action and market structure.
A strong demand zone usually forms before a powerful bullish move. Price consolidates briefly and then rallies aggressively upward. The base area before the rally becomes the demand zone.
A strong supply zone forms before a sharp bearish movement. Price pauses temporarily before falling aggressively. That consolidation area becomes the supply zone.
Professional traders look for zones with:
| Strong Zone Characteristics | Why It Matters |
|---|---|
| Explosive price movement | Indicates institutional activity |
| Minimal time spent in zone | Shows imbalance strength |
| Fresh untouched zones | Higher probability of reaction |
| Strong momentum candles | Confirms buying or selling pressure |
The strongest zones often create sharp reversals with minimal retracement.
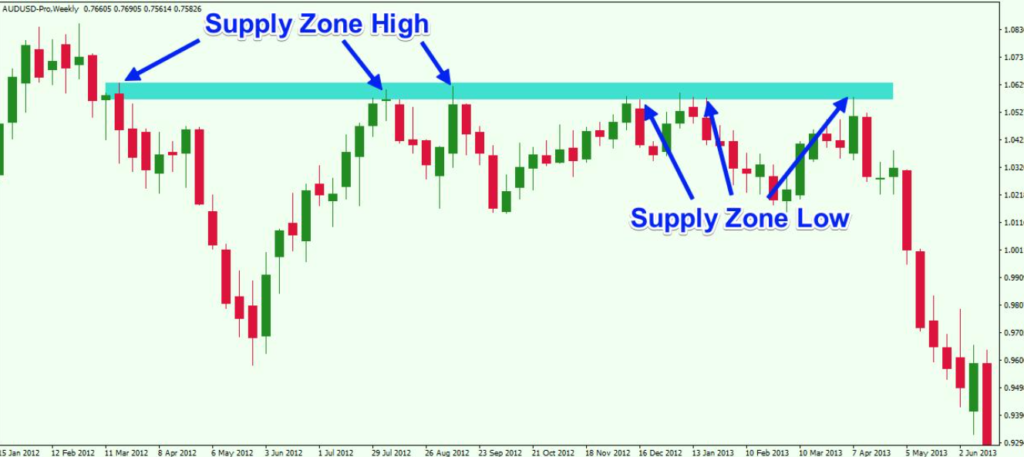
Fig 1.2 supply demand forex zones infographic explaining bullish and bearish zones
A successful forex supply and demand strategy focuses on patience, confirmation, and market context. Traders wait for price to revisit important zones before entering positions.
In trending markets, traders look for pullbacks into demand zones during uptrends or supply zones during downtrends.
For example, if EUR/USD is trending upward, traders wait for price to retrace into a fresh demand zone before looking for bullish confirmation.
This approach improves entry precision and risk-to-reward ratios.
Reversal traders use supply demand forex zones to identify potential turning points after extended trends.
If price reaches a strong weekly supply zone after a prolonged bullish trend, traders may look for bearish confirmation signals such as engulfing candles or rejection wicks.
Professional traders often combine higher and lower timeframes for stronger analysis.
For example:
This layered analysis improves trade accuracy significantly.
Many beginners confuse forex supply and demand with traditional support and resistance trading. Although similar, they are not identical.
Support and resistance focus mainly on historical price reactions. Supply and demand focuses on institutional order imbalance and strong market movement.
Supply and demand zones are usually broader areas rather than exact price lines. They represent regions where large buy or sell orders previously entered the market.
This makes supply demand forex zones more dynamic and often more effective during volatile market conditions.
Risk management remains essential even when trading strong supply and demand zones.
One of the biggest mistakes traders make is entering trades blindly without confirmation. Price can temporarily break zones before reversing.
Professional traders manage risk carefully by:
| Risk Management Rule | Benefit |
|---|---|
| Using stop losses | Protects trading capital |
| Waiting for confirmation | Reduces false entries |
| Avoiding overtrading | Improves consistency |
| Trading fresh zones only | Increases probability |
| Using proper position sizing | Controls account risk |
The goal is not to win every trade but to maintain long-term profitability through disciplined execution.

Fig 1.3 multi timeframe forex supply and demand analysis on trading charts
Many traders struggle with forex supply and demand because they misunderstand how zones work.
One major mistake is marking weak or overused zones. Fresh zones generally produce stronger reactions than zones tested multiple times.
Another common issue is ignoring overall market trend. Trading against strong momentum often reduces the effectiveness of supply and demand setups.
Some traders also place stop losses too tightly near zones, causing trades to fail due to normal market fluctuations.
Patience is critical. The best supply demand forex zones are often clear, clean, and aligned with broader market structure.
The popularity of forex supply and demand trading comes from its simplicity and effectiveness.
Major advantages include:
Unlike complicated indicator systems, supply and demand trading focuses directly on price movement and market imbalance.
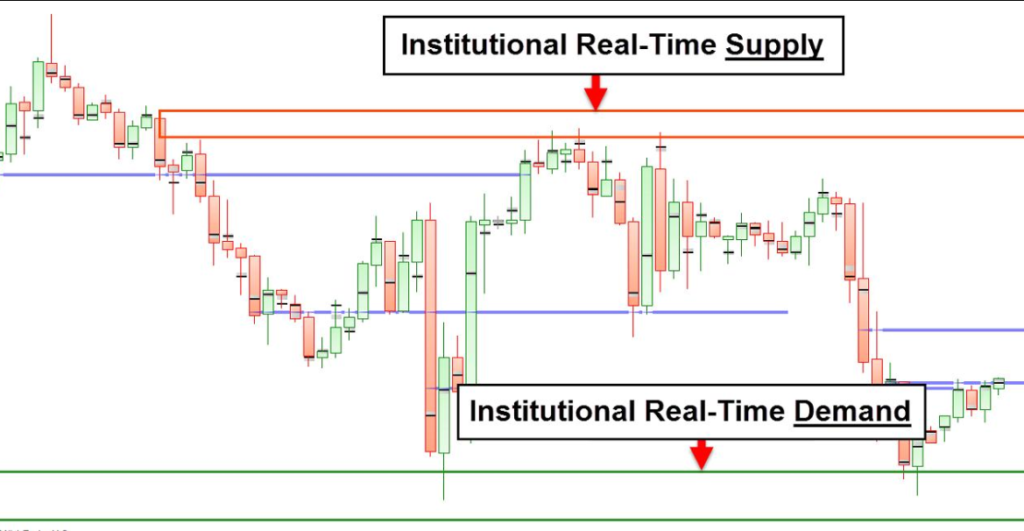
Fig 1.4 forex institutional trading zone with strong supply and demand imbalance
Understanding forex supply and demand can completely change the way traders analyze the market. Instead of relying solely on lagging indicators, traders begin focusing on institutional activity, price imbalance, and high-probability market zones.
The power of supply demand forex zones lies in their ability to reveal where major buying and selling activity previously occurred. These areas often become key market turning points and provide traders with structured entry opportunities, better risk management, and improved market understanding.
However, success with supply and demand trading requires patience, discipline, and proper confirmation. The best traders do not chase price movements emotionally. They wait for the market to revisit important zones and execute trades with a clear plan.
In today’s competitive forex market, mastering forex supply and demand trading can provide a significant edge for traders seeking consistency, precision, and long-term profitability.